Wednesday, September 28, 2011

Alligator Cupcakes

This picture didn't turn out great, but these cupcakes were really cute! Fun and reasonably easy. Remember to refer to the picture if you don't understand what it's going to look like. Here is how...

INGREDIENTS:
12 baked cupcakes
12 nutter butter cookies
24 green fruit loops
1/2 c. green decorating sugar
2 cups frosting
Blue and black food coloring
Small ziploc bag
2 pieces scotch tape

Start by coloring the frosting. Color 2 T. of the frosting black. Split the rest of the frosting into two bowls and color one blue. Set them aside. Take one cookie at a time and cut one end to form the nose of the gator.

Frost the cupcakes with the blue frosting. You don't need much frosting. You only need about 1 T. of frosting for the entire cupcake. Frost the top of the cookie with the white frosting. Cover completely with green decorating sugar. Push the gator into the blue frosting.

Next we'll do the eyes. Take the green froot loops and cut the bottom part off so that it can lay flat on the alligator's head. Push them into the green frosting by the top of the head. Use the black frosting to pipe little dots in the froot loops for the pupils and nostrils.

The teeth are easy, but it takes practice. Don't get discouraged if your first few don't turn out the way you want them to. Reinforce the corner of your ziploc bag with a piece of scotch tape. Flip the bag over and reinforce the other side. Fill the corner with the rest of the white frosting. Snip a small straight line across the tape. The opening should only be the size of the tip of a ball point pen. Along the top of the gators jaw pipe the teeth. The best way to get nice sharp teeth is to squeeze the bag and keep the bag in the same place. Stop squeezing when you have the size of tooth you want and pull away the bag. Do Not pull the bag away while you are still squeezing.

Flamingo Cupcakes

These cupcakes are really fun and are sure to get some great compliments. They take a little extra time, but taste amazing! Be sure to check out my tips before starting. Here's how...

INGREDIENTS:
12 baked mini cupcakes
12 long pretzel sticks
12 banana candies (runts)
12 pink jelly beans
1 c. pink frosting
2 T. pink decorating sugar
1 tsp. black frosting
1 1/2 c. pink melting chocolates
1 medium zioloc bag
2 pieces of scotch tape

The first thing you do is frost the cupcake. You don't need much frosting. If you are making a mini cupcake you only need about 1 tsp. of frosting. Frost the cupcake and roll in the pink sugar. If you wait too long then the sugar won't stick to the frosting. Do all 12 cupcakes and set aside.

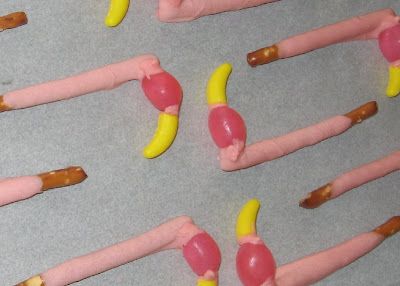
That part is easy. Now it gets a little more complicated. Put half of the pink melting chocolates in a small bowl. Melt in the microwave for 10 seconds. Stir. Melt again for 5 seconds at a time until you get the desired consistency, which is like thick cream. You will now need a cookie sheet lined with parchment or wax paper. Dip the pretzel in the chocolate and set on the cookie sheet. Then you dip the tip of the jelly bean in the chocolate and place on the top side of the pink pretzel. It should look like a head. Last, you dip a small amount of the yellow banana candy in the chocolate and attach that to the jelly bean. It should look like the beak. Do this with all 12 pretzels. If you have any questions about how to do this, see the picture at the bottom of the post. If you still have questions, you can leave a comment and I will do my best to answer it.

Reinforce one of the corners of the ziploc bag by putting one piece of tape along the corner. Fold over to fit the bag. Then turn the bag over and repeat on the other side. Now, put other half of pink melting chocolates in a ziploc bag. Do Not seal the bag. Microwave it for 10 seconds. Pull it out and squish the bag around. Microwave for 5 more seconds and stop and squish the bag. Repeat this until all the chocolate has melted and there are no more lumps. On the same cookie sheet as the heads, you will be making the wings. Snip a medium sized hole on the taped corner of the bag. The opening should be slightly smaller than a pea. Make a 2" line, three small waves and back down again. Fill in any white space. You will need to make 24 wings.
Put the tray of heads and wings in the fridge to become hard. The only need to be in there for about 5 minutes, but longer is fine. Just make sure the chocolate is nice and hard before you try to take them off. Insert the wings in the middle of the cupcake. Then do the head. Last, use a small amount of black frosting to make a line on the beak (glisen mark) and an eye on either side of the pink jelly bean.

Ta da! Here are a few tips to make sure they turn out the way you want them to...

Tip#1. Do not use Jelly Belly's. They are too small and look funny with the big banana nose. They also become top heavy and don't stand up when you put them on the table.

Tip#2. When buying melting chocolate, do not bu
y white chocolate and try to dye it pink. It changes the chocolate somehow and will not melt.

Tip#3. You can use regular cupcakes if you want. In my opinion they don't turn out as cute as the mini cupcakes, but you can be the judge.

Tip #4. I use a quart size ziploc bag. The sandwich bags are plenty big, but they aren't as thick and sturdy as the quart sized ones.
*I got this idea from Hello Cupcake

Tuesday, September 27, 2011

Sunflower Cupcakes

Here are some fun sunflower cupcakes. They are very easy to make too. I'll walk you through a step by step tutorial on how to make these. Make sure to read through my tips at the end of the post before making them. Here's how...

Ingredients:
24 baked cupcakes
24 oreo cookies
24 red m&m's
3 c. white frosting
2 T. chocolate frosting
Yellow and green food coloring
1 small, 1 medium ziploc bag (or pastry bag if you have one)
A little tape

Color about a cup of the frosting green. Color the remaining frosting yellow. Spread a small amount of green frosting on top of the cupcakes. If you use too much the cookie will slide off the cupcake. You only need enough to lightly frost it. About 1 T. per cupcake. Place 1 oreo cookie on top of the green frosting. Right in the middle.

Now the yellow frosting is a little tricky. Take the medium ziploc bag and reinforce one of the bottom corners with 2 pieces of scotch tape. I usually use a quart size bag. Fill the bag with yellow frosting. Use a pair of scissors to cut a medium sized V shape out of the corner of the bag. The opening should be the size of a pea. If using a pastry bag you will need a leaf tip.

Take a cupcake and place the tip of your bag right nest to the cookie. Give it a good squeeze. DO NOT pull your hand away as you squeeze the bag or your petals will turn out too long and flimsy. After you get the size petal you want stop squeezing the bag and pull away. Repeat around the entire cookie. Do all 24 cupcakes.

Now for the lady bug. You'll do the same thing you did for the yellow frosting bag. reinforce the corner with 2 pieces of scotch tape. Put the small amount of chocolate frosting in the bag. Snip a very small straight line across the tip of the bag. Frost a straight line down the middle of the red m&m. At one the ends make a small head across the tip of the candy. Add spots using the same technique as the flower. Squeeze, stop, then pull away.

Last, put a small spot of frosting on the bottom of your lady bug and place on top of your chocolate cookie. Finished!

Now here are a few tips to make sure they turn out the way you want them to.

Tip#1. Use a thick frosting. When I use store bought frosting I find that it isn't thick enough and the flower petals melt off the cookie and turn into a goopy mess.

Tip#2. The easiest way to fill a bag with frosting is this. Grab the taped corner of the bag with your hand. Open the bag with your other hand and wrap it around the hand holding the corner. Open hand. Fill your hand that's covered with plastic with the frosting. Using that same hand grab the frosting and use the other hand to bring the bag back around to seal it. Confusing I know, but it's the least messy way of filling a bag :)

*I got this idea from Hello Cupcake